Almost everything Google creates seems to be a huge success.
Google has not only helped online businesses make billions of dollars with its search engine, but it has also expanded to develop many other products.
One of these tools is Google Docs, a free word processor that works like Microsoft Word. It lets anyone easily create, edit, and share documents with others.
Google Docs is a powerful tool. With so many features, it can feel a bit overwhelming when you're starting out. That’s why we’ve put together this guide—to show you how to use Google Docs to write great content and easily work with others. Plus, we’ll share some helpful tips and tricks to make everything smoother for you.

Unlock Your Potential: Become a Google Docs Pro in No Time
Master Google Docs in no time! Unlock your potential with essential tips and advanced features for seamless document creation and collaboration. Become a pro and streamline your workflow today...
- Learn Google Docs essentials and advanced features.
- Boost productivity with seamless collaboration.
- Master efficient document creation in no time!
- And More!
What is Google Docs?
Google Docs is a free, online word processing tool. It lets you create, edit, and share documents right from your browser. You don’t need to download anything! Your work is saved automatically in Google Drive, so you can access it from any device, like your computer, tablet, or phone. Plus, it’s super easy to collaborate with others. You and your teammates can work on the same document at the same time, no matter where you are!
No need to download any software. No fees. No special browser or fancy computer required. Is there really a tool out there today that’s this easy to access and use?
Yes, it is!
Google Docs is a totally free word-processing tool that you can use on your phone, tablet, or computer. It lets you access your documents from anywhere! Whether you’re online or offline, your files are always at your fingertips. You only need a Google account—the same free account you use for GSuite or Gmail.
Google Docs has a simple design and offers special features that make writing and teamwork easy. You can access your work from anywhere and share it with others to collaborate. Plus, the tool automatically saves everything for you, so you’ll never have to worry about losing your work or hitting the Save button!
With all these great tools, it's easy to see why so many people love using Google Docs instead of other writing programs. (By the way, if you're looking for more tips to boost your Google Docs skills, we can help you out!)
Google Docs vs. Microsoft Word: Which One Should You Use?
Let’s not overlook Microsoft Word either. It has been around for much longer than Google Docs and is still very popular today. Many people and businesses spend a lot of money to use Word. So, how does Google Docs stack up against Microsoft Word?
First of all, Google Docs is free if you have a Google account. On the other hand, Microsoft Word comes with a price since it is part of the Microsoft Office suite, which also includes other tools like PowerPoint, Excel, and Outlook.
The Home and Business plans range from $69.99 (for personal use at home) to $150 (for business use) per year. In comparison, Google Docs lets you work with as many people as you want, from anywhere, without costing you a penny.
One big difference with Google Docs is that all your work is saved online in the Cloud. This way, even if your computer crashes, you won’t lose your 20-page report. (What a relief!) But with Microsoft Word, your files are stored on your computer, so your coworkers can’t see them unless you share the file through email or another way.
Whether you prefer Google Docs or Microsoft Word, it’s easy to work with both. You can quickly turn a Word file into a Google Doc by uploading it. Here’s how to do it.
Go to your Google Drive and click on the “New” button.
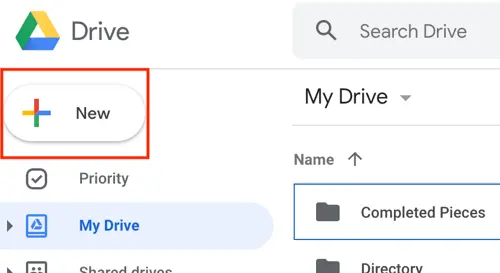
Click on "File upload" to choose and open files from your computer.
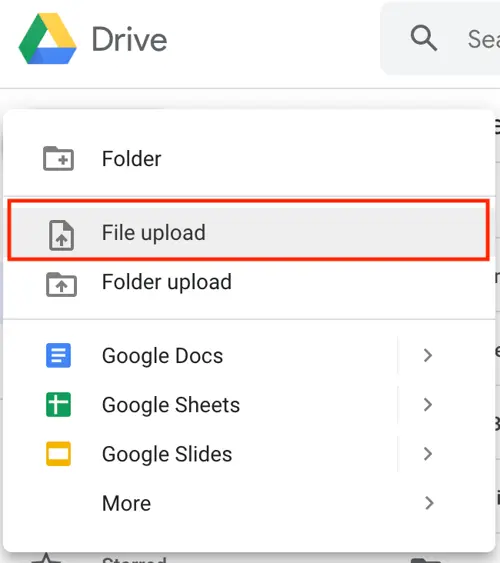
Select your Word file from your computer and hit Open. This will add your file to your Google Drive. Once it's uploaded, double-click the file to open it. Then, click on Google Docs from the menu at the top.
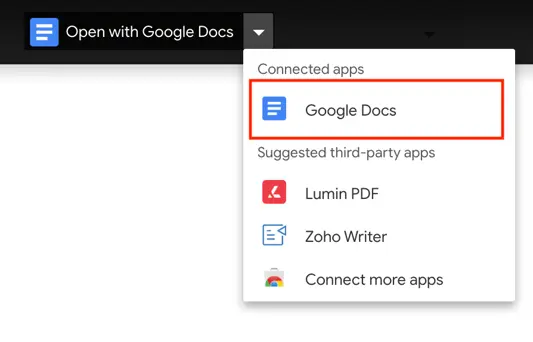
And there you have it! That's how you turn a Word document into a Google Docs file. Next, let's dive a little further into how you can make the most out of Google Docs.
There are lots of handy tips and tricks you can use when working in Google Docs, whether you're working alone or with others.
Google Docs lets many people work together, share ideas, and make changes to the same document at the same time using any web browser. Here’s how to use it.

Unlock Your Potential: Become a Google Docs Pro in No Time
Master Google Docs in no time! Unlock your potential with essential tips and advanced features for seamless document creation and collaboration. Become a pro and streamline your workflow today...
- Learn Google Docs essentials and advanced features.
- Boost productivity with seamless collaboration.
- Master efficient document creation in no time!
- And More!
Collaborating in Google Docs
There are a plethora of tips and tricks that users can take advantage of while using Google Docs — whether working as an individual or with a team.
Google Docs allows multiple people to work, collaborate, and edit within a single document in real-time through any web browser. Here's how.
How to Share Your Google Doc
Users can share their document with as many people as they like, and they can also adjust permissions to control what others are allowed to do.
To begin sharing, go to the File menu and click on Share and Share with others.
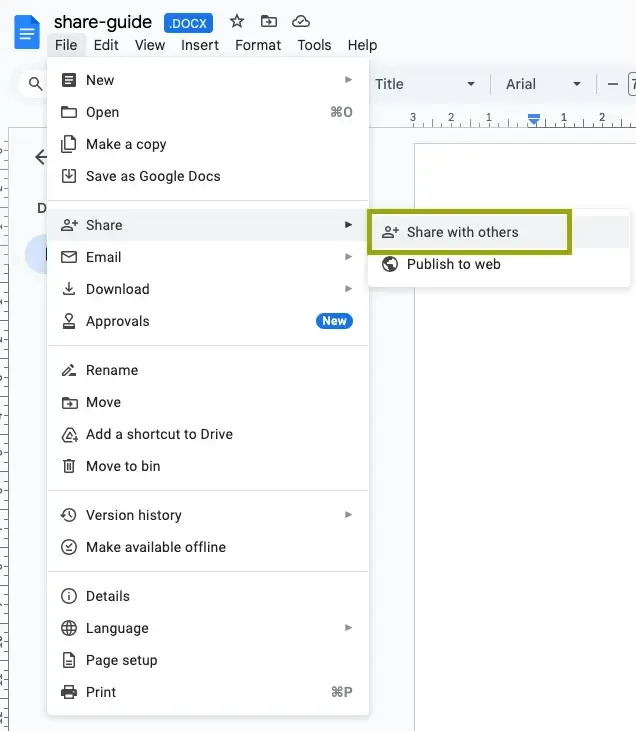
There are four sharing options available — you can choose whichever one works best for you.
1. Create a shareable link.
The easiest way to share a Google Docs file is by creating a shareable link. This gives anyone with the link access to view your document with just one click.
After you click on Share, press the Get Link button at the top right.
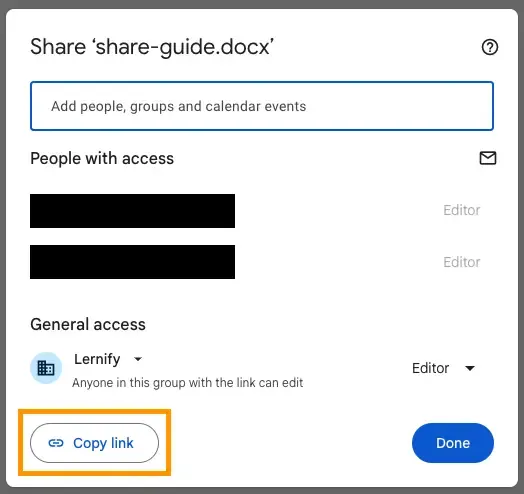
Choose who can view or edit your document.
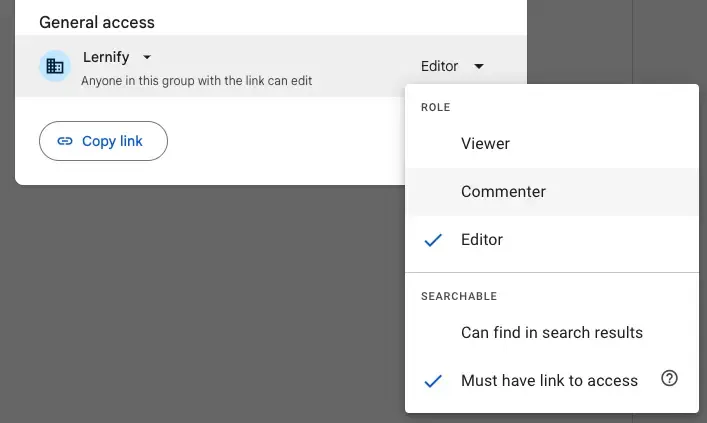
Once you’ve set the permissions, click the Copy link button.
The link will be copied to your clipboard, ready for you to share with anyone who wants to see the document.
2. Share via email address.
You can also share your document by entering someone’s email address. This way, they’ll get an invitation in their inbox, and the document will show up in their Google Drive.
To do this, go back to the sharing menu.
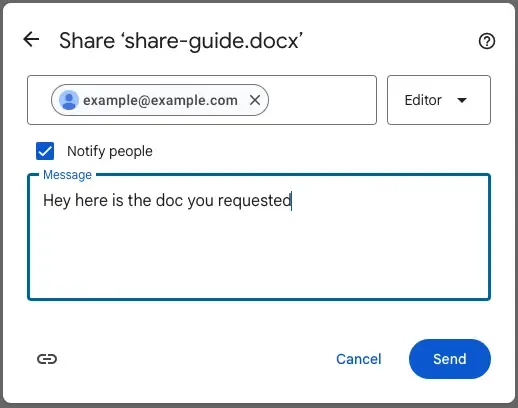
Type in the email address of the person you want to share your document with. Then, choose an option from the drop-down menu to set what they’re allowed to do, like view, comment, or edit.
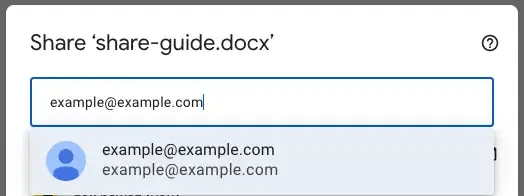
If you include a message in this invite, it will show up in the email invitation.
3. Choose the advanced sharing options.
Return to the sharing box and click on permissions drop down.
Here, you can check all the sharing options — like who can see your document, what they are allowed to do with it, and the ability to add more people or take some away.
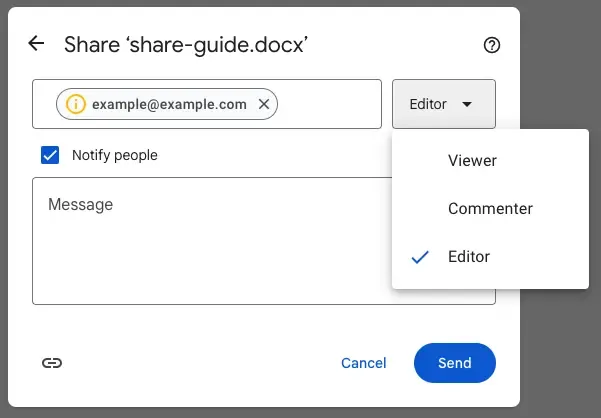
4. Make your document editable by anyone.
Need to let someone else edit your document? Just click on File > Share > Share with others to create a link you can send to others.
Next, select "Anyone with the link" and choose the desired permission option from the drop-down menu below.


This option means that anyone with the link can edit your document. So, make sure you only share it with people you trust!

Unlock Your Potential: Become a Google Docs Pro in No Time
Master Google Docs in no time! Unlock your potential with essential tips and advanced features for seamless document creation and collaboration. Become a pro and streamline your workflow today...
- Learn Google Docs essentials and advanced features.
- Boost productivity with seamless collaboration.
- Master efficient document creation in no time!
- And More!
Mastering Google Docs Shortcut Keys: Simple and Useful Tips
Google Docs offers many keyboard shortcuts that can help you work faster. Take a look at the chart below to discover some of the most common shortcuts you can start using right away.
| Actions | MAC Shortcuts | PC Shortcuts |
| Copy | ⌘ + c | Ctrl + c |
| Paste | ⌘ + v | Ctrl + v |
| Cut | ⌘ + x | Ctrl + x |
| Paste without formatting | ⌘ + Shift + v | Ctrl + Shift + v |
| Undo | ⌘ + z | Ctrl + z |
| Redo | ⌘ + Shift + z | Ctrl + Shift + z |
| Insert/edit link | ⌘ + k | Ctrl + k |
| Open link | Option + Enter | Alt + Enter |
| Show common keyboard shortcuts | ⌘ + / | Ctrl + / |
| Save (Google Drive automatically saves to Drive) | ⌘ + s | Ctrl + s |
| ⌘ + p | Ctrl + p | |
| Open | ⌘ + o | Ctrl + o |
| Find | ⌘ + f | Ctrl + f |
| Insert page break | ⌘ + Enter | Ctrl + Enter |
| Hide menus (compact mode) | Ctrl + Shift + f | Ctrl + Shift + f |
To see a full list of shortcut keys for Mac, PC, Android, iPhone, and iPad, visit this page.
Getting Started with Google Docs: How to Create and Write
What features in Google Docs will make it easier for you and your team to create amazing documents from anywhere? Here are some tools you can explore.
- Offline Access
- Voice-to-Text
- Google Docs Mobile
- Research Tool
Use Google Docs Offline
One great thing about using Google Docs is that you can still edit, save, and create documents in your web browser even if you don’t have an internet connection. This can be really helpful when you need to get work done while you're on the go. Any changes you make will automatically save and update once you're back online.
However, this feature isn't automatic. You’ll need to enable offline access in your account.
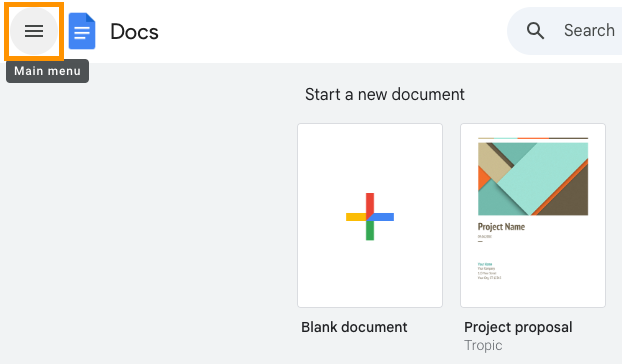
First, go to the Google Docs homepage and look for the menu button on the left side of the screen.
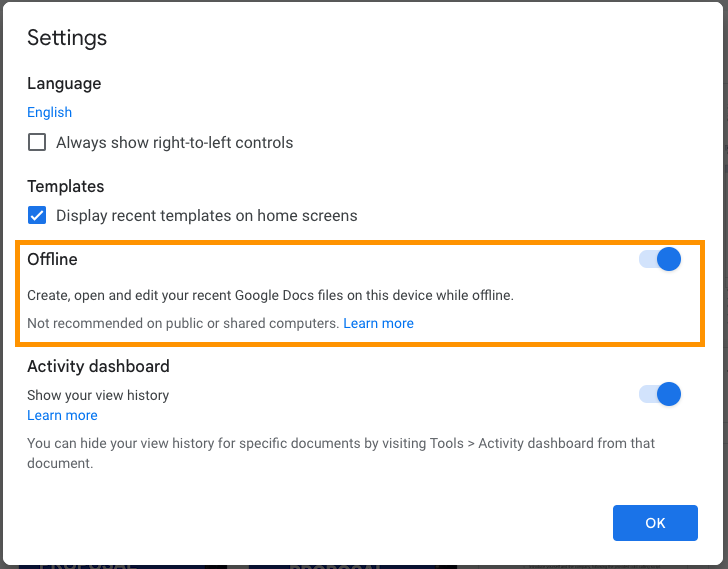
Next, click on Settings.

A box will appear on your screen. To enable offline editing, simply switch the Offline button to On. (The button should turn blue instead of gray.)
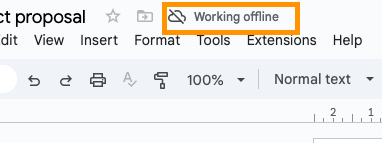
Your browser will switch to offline mode, and you’ll notice this icon when you’re working on your document without an internet connection.
Voice typing
The voice typing feature in Google Docs can make writing faster and easier. Google has been a leader in voice technology, and this tool lets you write by speaking instead of typing.
To get started, first check your device’s settings to make sure your microphone is working properly.
Next, go to Tools > Voice Typing. A small microphone icon will appear.

Click on it and start talking. Google Docs will turn your speech into text right on the page for you to see.
Google Docs
Using the Google Docs app, you can keep editing, sharing, working together in real-time, adding pictures, and making content even when you're on the move.
The free app can also work when you're offline once you've enabled that option — just like you would on your computer — and it will save your work to the Cloud automatically.

Unlock Your Potential: Become a Google Docs Pro in No Time
Master Google Docs in no time! Unlock your potential with essential tips and advanced features for seamless document creation and collaboration. Become a pro and streamline your workflow today...
- Learn Google Docs essentials and advanced features.
- Boost productivity with seamless collaboration.
- Master efficient document creation in no time!
- And More!
Formatting Your Document in Google Docs
Google Docs makes it easy to create a document that fits your needs. Whether it’s adjusting the page layout, adding images, or inserting page numbers, these simple tips will help you format your document just the way you like it.
Adjusting Your Page Margins
If you want to use the space in your document better or get it ready for printing, you may need to adjust the margins.
First, you'll want to check that the ruler is showing at the top of your document.
Just go to View and click on Show Ruler.

You will notice a ruler just underneath the toolbar in your document.
Next, to adjust the margins of your page, find the small blue triangle on the left side of the ruler and drag it to change your left margin.
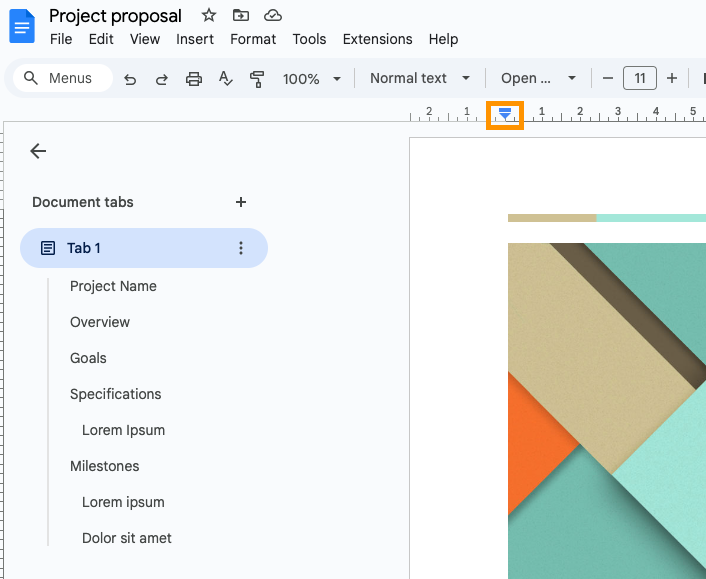
To adjust the right margin in Google Docs, just move the blue button on the right end of the ruler.
If you want to set specific margins for your document, go to File > Page Setup.

A pop-up box will appear, letting you adjust the margins easily.
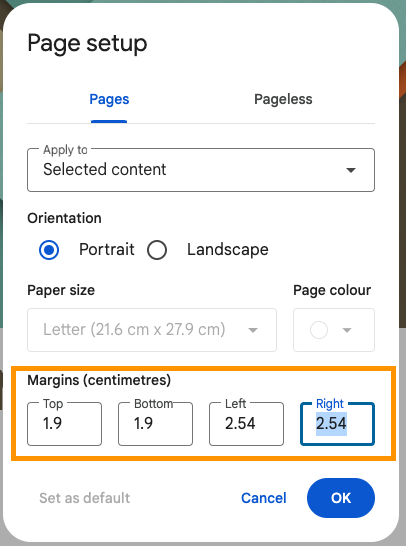
If you want the same margins for all your documents, you can save time by clicking on "Set as Default." This way, every new document you create will automatically have the margins you prefer.
Switching the Page to Landscape
Want to switch the direction of your document? Just go to File > Page Setup.
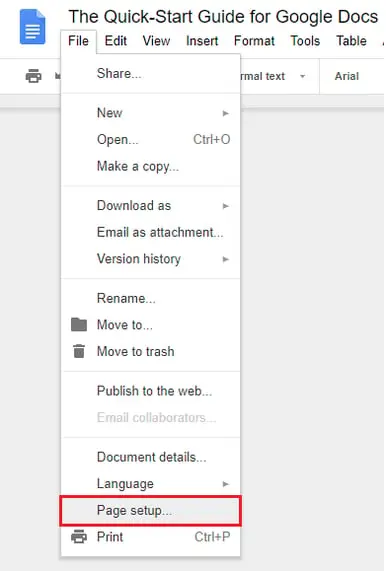
Next, choose Landscape from the Orientation options.

If you want all your documents to automatically have the same orientation, click on Set as Default.
Inserting a Text Box
Text boxes are a useful feature when you want to add more text in a specific spot without messing up the rest of your document. They make it easy to place extra content wherever you'd like, helping your document look more organized and creative.
In Google Docs, text boxes are actually part of the drawing tool. To add one, go to Insert > Drawing > New.

This will open the Drawing tool. Then, click on Text Box.
Click and drag your mouse in the drawing area to make a box that matches the size you need.

After you've made your text box, you can start typing your content inside.
You can adjust the font, text color, and alignment by using the toolbar at the top of your screen in Google Docs.
Happy with your text box? Simply click Save & Close to add it to your document.

At this point, your text box acts like an image. Click on it to adjust its position or change the alignment, so you can place it perfectly within your document.

Unlock Your Potential: Become a Google Docs Pro in No Time
Master Google Docs in no time! Unlock your potential with essential tips and advanced features for seamless document creation and collaboration. Become a pro and streamline your workflow today...
- Learn Google Docs essentials and advanced features.
- Boost productivity with seamless collaboration.
- Master efficient document creation in no time!
- And More!
Inserting Page Numbers
Adding page numbers to your document helps keep it organized and makes it easier to find specific sections — especially when you print it out. No more wondering, “Where does this page belong?”
To add page numbers to your document, go to Insert > Page Numbers. Then, pick the style you prefer for your document.

Making a Hanging Indent
Hanging indents move the first line of a paragraph in, while the rest of the lines stay at the margin. This helps keep your page format looking neat and organized.
Here’s a guide that shows you how to use Google Docs like a pro!
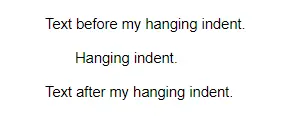
To create a hanging indent in Google Docs, first check that your ruler is visible by going to View > Show Ruler.

Next, return to your main document and select the text you wish to format.
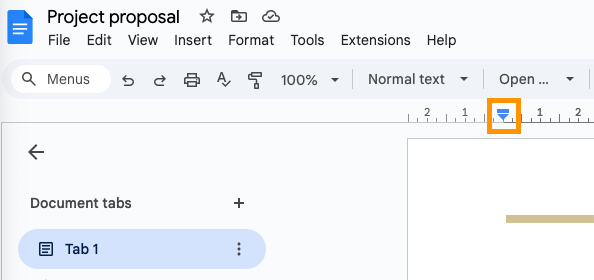
To add a hanging indent, find the ruler at the top of your document. Then, move the blue markers to the spot where you want the indent to start.
Move the arrow on the left to adjust the left indent, and slide the arrow on the right to modify the right indent.
Adding an Image
To insert an image in your document, just click where you want the picture to go.
Go to the top of the page and click on Insert, then choose Image.

Pick where you want the image to come from — you can choose from your computer, the web, Google Drive, or by using a URL.
Choose your image, hit Open, and there you go! Your picture should show up.
To learn more about how this works, visit this link.
Making a Table of Contents
Creating a table of contents is super helpful if you're working on something like a report or presentation. It lets readers quickly see the different sections and find the page where each topic starts.
To add a table of contents in your Google Doc, make sure your subheadings are formatted with a heading style. Simply highlight the subheading, then choose the right heading option from the formatting toolbar.

Typically, you'll want to use the Heading 1 tag for your main title. Heading 2 tags work well for subheadings, and Heading 3 tags are great for topics under those subheadings.
Now it’s time to add a table of contents! Place your cursor where you want it to go, then click on Insert > Table of contents. You can pick the style that works best for you from the options.


Unlock Your Potential: Become a Google Docs Pro in No Time
Master Google Docs in no time! Unlock your potential with essential tips and advanced features for seamless document creation and collaboration. Become a pro and streamline your workflow today...
- Learn Google Docs essentials and advanced features.
- Boost productivity with seamless collaboration.
- Master efficient document creation in no time!
- And More!
Making Changes to Your Document in Google Docs
Google Docs provides many editing tools to help make your writing as great as it can be.
Reviewing Edits
When you're working on a document with someone else, you can ask them to track changes. This feature lets you see who made changes, what changes were made, and when they happened. It also shows you what the original text looked like before the edits were made.
To track changes in Google Docs, switch from Editing to Suggesting mode by clicking the button in the top right corner of the screen.
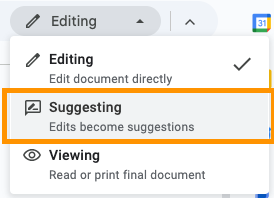
When someone makes edits to your document, their changes will appear in a different color. You’ll also see a box on the right side that shows their name, picture, and more details about what they changed.

After that, you can go through the suggested changes and choose to either accept or reject them.
Adding Comments
With Google Docs, you and your team can add comments in a document that everyone can see. Comments are helpful as reminders to revisit certain parts, share suggestions for changes, or include links to other websites or images for reference.
To do this, highlight the word, sentence, or paragraph you want to comment on, then click the Add Comment button (it looks like a text box with a plus sign inside).
Next, type your comment or add a link in the comment area. Once you're finished, just click "Comment" to post it.
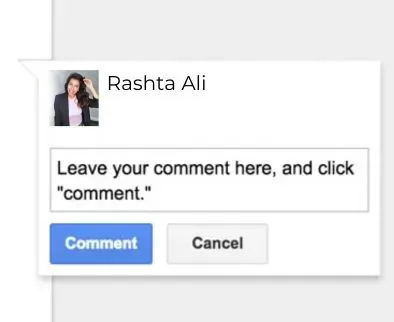
To change the information in the box, click on the three dots in the corner and choose Edit. You can also add replies by typing in the Reply box below the original comment.
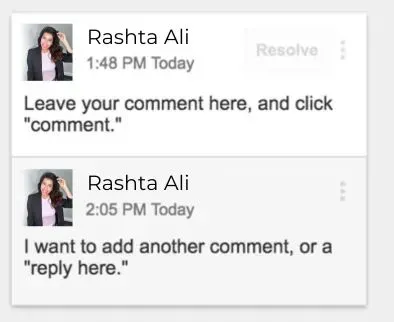
To remove a comment box, you can either delete it or mark it as resolved. To delete, click the three dots on the right side of the comment and choose Delete. If the issue has been taken care of, click Resolve at the top right of the comment to close it.
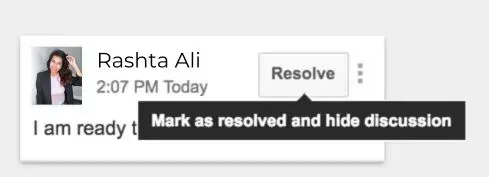
For more detailed instructions on how to add and resolve comments in Google Docs, check out this page.
Finding Word Count
Have you ever found it hard to finish writing a paper, report, or blog post because you were trying to hit a certain word count?
While hitting a specific word count can sometimes be tricky, Google Docs makes checking your word count super simple.
When you're in your document, go to Tools and choose Word Count. (You can also press ⌘ + Shift + c as a shortcut.)

Google will then show you the total word count, as well as the number of pages, characters, and characters without spaces.

To count the words in a particular sentence, paragraph, or page, highlight the text you want to check and repeat the same process mentioned earlier.
Checking Your Spelling
Even professional writers can make spelling mistakes from time to time. Luckily, Google Docs is here to help with that problem.
Use spell check to find and fix any mistakes you might have overlooked. It's like having your own personal editor watching out for you!
If you want to check your spelling in Google Docs, go to Tools > Spelling > Spell check.

Google Docs will check your whole document for any spelling and grammar mistakes. It will then offer suggestions, and you can choose to accept or skip them.
If you notice that Google Docs keeps marking a word you often use as a mistake, you can add it to your personal dictionary. This will stop Google Docs from flagging it during future spell checks.
Using Strikethrough in Google Docs
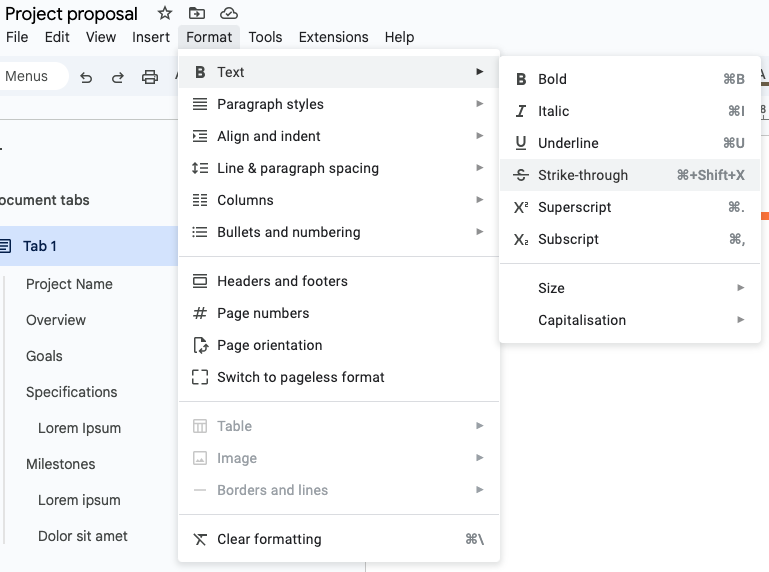
In Google Docs, if you want to add a strikethrough, just highlight the text, then go to Format > Text > Strikethrough.
Exploring Google Docs Add-Ons
You can use third-party tools, called add-ons, in your documents. These add-ons have special features that make it easier to improve your writing and save time.
You can access these add-ons by clicking on Extensions > Add-ons > Get add-ons...

Here are some useful add-ons you might want to try.
Google Keep
Working on a document that needs research? Try installing Google Keep in your browser to gather notes, articles, and references. Later, you can easily use the add-on to bring them into your document whenever you need. Plus, you can make edits to your saved notes in Google Keep too!
Extensis Fonts
Maintaining a consistent look is key, but it can be tough when you want to use special fonts. The Extensis Fonts add-on solves this by giving you access to thousands of fonts from Google Fonts, right inside your document. This helps improve the visual appeal of your writing.
HelloSign
Creating a document that needs a signature, like a contract or agreement? The HelloSign add-on lets you gather electronic signatures quickly and safely.
Translate
Looking to translate your document? You can install the Translate add-on to quickly convert your text into another language.
Lucidcharts
The Lucidchart add-on lets you create custom diagrams right inside your document. It's easy to design and edit, making it great for people who want to display data or information in a more creative way.
Language Tool
Grammarly for Google Docs helps with spelling and grammar across multiple languages. It makes it simple to catch mistakes and improve your writing, no matter what language you're using.
EasyBib
EasyBib is a tool that helps create bibliographies automatically. It offers more than 7,000 citation styles, such as MLA, APA, and Harvard.
Using Google Sheets and Google Forms with Google Docs
Google Docs works really well with other tools like Google Sheets and Google Forms. For example, if you make a spreadsheet or chart in Google Sheets, you can easily add that data right into your Google Docs.
With Google Forms, you can make surveys that automatically save to your Google Drive so you can easily view and organize them later through Google Docs.
Google Sheets
Google Sheets is perfect for creating charts, lists, plans, or any type of spreadsheet you need. It's similar to Excel but has the added bonus of being free to use!
After you’ve made your chart in Google Sheets, it’s simple to add it to your document.
Go to the toolbar and click on Insert > Chart > From Sheets. Then, you will see your available charts and can pick the one you want to add to your document.

Google Forms
Google Forms is an awesome tool for gathering information and feedback. Simply visit the Google Forms website, and you can start building your form or survey in just a few moments.
Your team can work together and pick a template from Google’s template gallery, or you can design your own from the ground up to match your style perfectly.

Google Forms is free to use and can also connect with tools like Asana and Lernify.
Plus, all of your Google Forms and the responses are automatically saved to your Google Drive. This makes it simple to access them right from your Google Docs when you need them.
To get started, click on the apps icon when you’re in Google Docs. Then, scroll down and select Forms to find the survey or quiz you need to access.

Another awesome feature is that anyone filling out your form or survey can use any kind of device, which makes Google Forms super easy to use for everyone.
Introduction to Google Docs: Your First Steps
Great job! You’re now a Google Docs expert. Whether you're a student, writer, or business owner, these tips will help you make the most of Google’s tools and create amazing documents with ease, no matter your experience level.
Google Docs lets you easily share your documents with others, which makes it perfect for team projects. It automatically saves your work to the Cloud, so you don’t have to worry about losing what you've written. Plus, you can access and edit your files from any place, even if you're offline.
With so many helpful tools, it's easy to understand why so many people love using Google Docs. And the best part? It’s completely free! So, why not check it out and see what you think?

Unlock Your Potential: Become a Google Docs Pro in No Time
Master Google Docs in no time! Unlock your potential with essential tips and advanced features for seamless document creation and collaboration. Become a pro and streamline your workflow today...
- Learn Google Docs essentials and advanced features.
- Boost productivity with seamless collaboration.
- Master efficient document creation in no time!
- And More!

